
Cleaning your car rubber floor mats might sound straightforward and routine. Yet, using harsh cleaners can actually ruin your mats and shorten their life by up to 40 percent. Most people jump right in with soap and water, but it turns out the real difference comes from the tools and prep you do before you even touch a brush. This guide reveals how small changes in your cleaning strategy protect your mats, save money, and extend their durability way beyond what you’d expect.
Table of Contents
- Step 1: Gather Cleaning Supplies and Equipment
- Step 2: Remove Mats from the Vehicle
- Step 3: Shake Out Dirt and Debris
- Step 4: Apply Car Rubber Floor Mat Cleaner
- Step 5: Scrub Using a Soft-Bristled Brush
- Step 6: Rinse and Dry the Mats Thoroughly
Quick Summary
| Key Point | Explanation |
|---|---|
| 1. Gather proper cleaning supplies first | Assemble soft brushes, microfiber towels, gloves, and a suitable rubber cleaner before starting. This will streamline the cleaning process significantly. |
| 2. Remove mats carefully from the vehicle | Detach mats according to manufacturer instructions to prevent damage and ensure thorough cleaning of both mats and vehicle floor. |
| 3. Shake out dirt and debris effectively | Shake and beat mats outdoors to eliminate loose dirt and debris, avoiding scratches during the deep cleaning phase. |
| 4. Apply cleaner uniformly and gently | Use a diluted rubber-specific cleaner and apply it in small sections using gentle circular motions for better dirt removal without damage. |
| 5. Rinse and dry mats thoroughly | Rinse with cool water to remove all cleaning agents, and dry in a ventilated area to avert moisture-related damage to the rubber. |
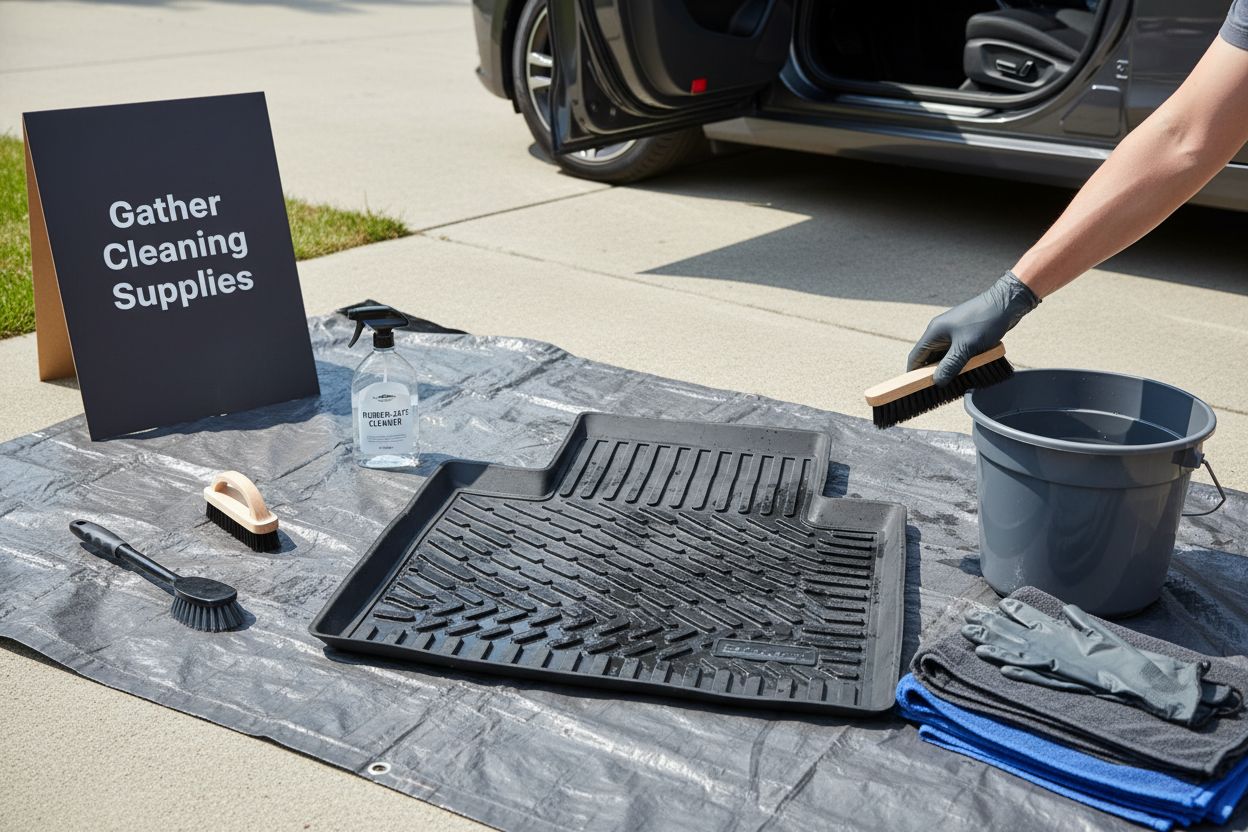
Step 1: Gather Cleaning Supplies and Equipment
Preparing effectively for cleaning your car rubber floor mats starts with assembling the right tools and materials. A strategic approach to gathering supplies ensures you can tackle the cleaning process efficiently and thoroughly. Professional cleaning requires specific equipment that protects both your floor mats and the surfaces around you.
For your car rubber floor mat cleaner project, you will need several key components. Begin by collecting a comprehensive set of cleaning tools that includes soft-bristled brushes, microfiber towels, a sturdy bucket, and protective gloves. Select brushes with varying bristle stiffness to handle different levels of dirt and grime on your rubber floor mats. Microfiber towels are particularly crucial as they provide superior absorption and prevent scratching delicate rubber surfaces.
Your cleaning solution arsenal should feature specific products designed for rubber materials. Look for pH-neutral cleaners that effectively remove dirt without causing material degradation. Avoid harsh chemicals like bleach or ammonia that can damage rubber’s structural integrity. Instead, opt for specialized automotive or rubber-specific cleaning solutions that maintain the mat’s flexibility and appearance.
Additional recommended supplies include:
- Rubber-safe cleaning solution
- Multiple microfiber towels
- Soft and medium-bristled brushes
- Protective rubber gloves
- Bucket for mixing cleaning solutions
- Optional: compressed air or handheld vacuum for initial debris removal
Preparation also means creating a suitable workspace. Choose a well-ventilated area with adequate lighting and space to maneuver. Lay down a protective tarp or work surface to catch drips and prevent potential mess. Organizing your supplies before starting will streamline the entire cleaning process and help you work more efficiently.
Verify you have all necessary items before beginning. A methodical approach to gathering supplies sets the foundation for successful car rubber floor mat cleaning, ensuring you can complete the task effectively and protect your investment.
Here is a summary table of recommended cleaning supplies and equipment, including their specific purpose to help you efficiently prepare for cleaning your car rubber floor mats.
| Item | Specification/Purpose |
|---|---|
| Soft-bristled brush | Gently removes dirt from rubber without causing abrasions |
| Medium-bristled brush | Tackles tougher spots and embedded grime |
| Microfiber towels | Absorbs moisture; prevents scratches on rubber surfaces |
| Rubber-safe cleaning solution | Cleans mats without damaging material integrity |
| Protective rubber gloves | Shields hands from chemicals and cleaning agents |
| Bucket | For mixing and dispensing cleaning solution |
| Optional: compressed air or handheld vacuum | Removes initial debris from mat crevices |
Step 2: Remove Mats from the Vehicle
Removing car rubber floor mats is a critical preparatory step that ensures thorough and efficient cleaning. Proper removal protects both your vehicle’s interior and the floor mats themselves. Before starting, understand that each vehicle model might have slightly different mat attachment mechanisms, so patience and careful observation are key.
Begin by adjusting your vehicle’s seats to provide maximum access to floor mats. Front mats typically require different removal techniques compared to rear mats. For front mats, slide the driver and passenger seats fully backward to expose the entire mat surface. Check for any retention clips, hooks, or Velcro attachments that secure the mat to the vehicle floor. Gently lift and wiggle the mat to disengage these fasteners without applying excessive force.
Rear floor mats often have unique challenges, especially in vehicles with complex interior configurations. Some mats might be fitted tightly around center consoles or have specialized anchoring points. When removing rear mats, take extra care to avoid catching edges on seat brackets or electronic components. If resistance is encountered, pause and inspect the attachment points carefully before attempting removal.
Additional considerations during mat removal include:
- Inspect mats for existing damage before removal
- Note original positioning to ensure correct replacement
- Check vehicle floor for any accumulated debris
- Handle mats gently to prevent unnecessary stretching
Photographing the mats in their original position can serve as a helpful reference for reinstallation. This step becomes particularly useful for complex vehicle interiors or if multiple mat sizes are involved. For comprehensive floor mat cleaning guidance, understanding proper removal techniques is fundamental.
Once removed, place mats on a clean, flat surface away from direct sunlight or heat sources. Avoid folding or crumpling rubber mats, as this can cause permanent creasing or damage. Your careful removal sets the stage for an effective and thorough cleaning process, ensuring your car’s floor mats receive the attention they need to look and perform their best.
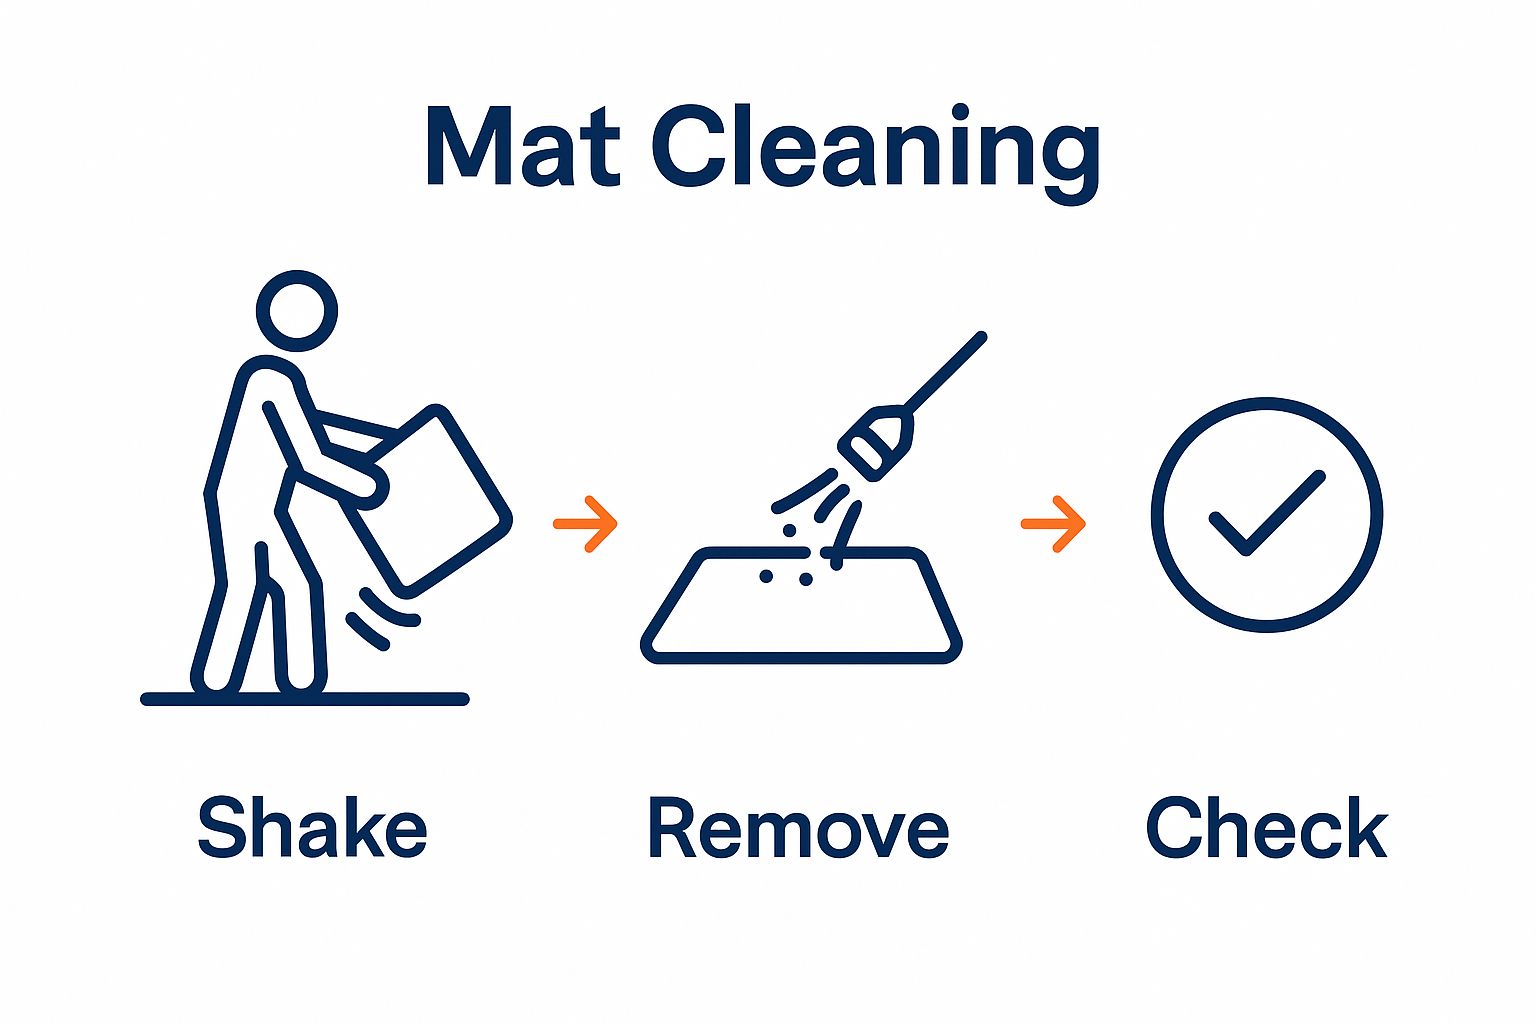
Step 3: Shake Out Dirt and Debris
Initiating the cleaning process requires a strategic approach to removing loose dirt and debris from car rubber floor mats. Initial debris removal is crucial for preventing scratching and ensuring a more effective deep cleaning. This step prepares your mats for thorough washing by eliminating loose particles that could potentially cause surface damage during subsequent cleaning stages.
Select an appropriate outdoor area for debris removal, preferably a concrete or hard surface away from your vehicle. Grass or dirt areas can redeposit particles back onto the mats. Shake mats with purposeful and controlled movements to maximize dirt displacement. Hold each mat at opposite corners and create a sharp, quick snapping motion that allows gravity to help dislodge accumulated dirt, sand, and small debris.
For rubber floor mats with textured surfaces, additional techniques might be necessary. Use a combination of shaking and gentle beating to release trapped particles. A soft-bristled brush can help loosen compacted dirt from intricate mat patterns without causing surface damage. Work systematically, starting from one end of the mat and progressing methodically to ensure complete debris removal.
Consider these additional strategies for comprehensive dirt elimination:
- Shake mats in multiple directions to dislodge stubborn particles
- Use compressed air for hard-to-remove debris in mat crevices
- Wear a dust mask to protect yourself from airborne particles
- Perform this step in a well-ventilated outdoor space
Practical floor mat cleaning techniques emphasize the importance of this preparatory stage. After shaking, visually inspect mats to confirm significant dirt reduction. Effective shaking should result in minimal dust falling when the mat is gently tapped or moved. The goal is to remove loose contaminants without causing stress to the rubber material, setting the stage for a more intensive cleaning process in subsequent steps.
Step 4: Apply Car Rubber Floor Mat Cleaner
Applying the right car rubber floor mat cleaner is a precision task that requires careful technique and strategic approach. The cleaning solution you choose directly impacts the mat’s appearance and longevity. Begin by thoroughly reading the specific cleaning product’s instructions, as different rubber formulations may require unique treatment methods.
Start by diluting your chosen cleaning solution according to manufacturer recommendations. Concentrated cleaners often require precise water mixing to achieve optimal cleaning performance. Wear protective gloves to shield your hands from potential chemical irritants. Select a soft-bristled brush or microfiber cloth specifically designated for rubber surface cleaning. This ensures you do not introduce abrasive materials that could damage the mat’s surface.
Apply the cleaning solution systematically, working in small sections to ensure complete coverage. Use gentle circular motions that help the cleaner penetrate dirt and grime without causing unnecessary surface stress. Pay extra attention to heavily soiled areas, allowing the cleaning solution to sit momentarily before gentle scrubbing. The goal is to lift dirt without aggressive rubbing that might compromise the rubber’s structural integrity.
Consider these key application techniques:
- Test cleaning solution on a small, inconspicuous mat area first
- Use consistent, light pressure during application
- Work from the mat’s center outward in controlled motions
- Avoid oversaturating the rubber surface
Detailed rubber floor cleaning techniques emphasize the importance of methodical application. After initial cleaning, inspect the mat to confirm uniform coverage and dirt removal. A well-applied cleaning solution should create a slight lather without pooling or running off the surface. The mat should appear evenly moistened but not dripping wet, indicating proper technique and preparation for the next cleaning stage.
Step 5: Scrub Using a Soft-Bristled Brush
Scrubbing with a soft-bristled brush represents a pivotal moment in your car rubber floor mat cleaning process. Proper brush technique can mean the difference between surface restoration and potential damage. Select a brush specifically designed for delicate rubber surfaces, with bristles soft enough to remove dirt without causing abrasions or compromising the mat’s structural integrity.
Begin your scrubbing technique by holding the brush at a slight angle, allowing maximum contact with the mat’s textured surface. Use controlled, circular motions that generate friction without excessive pressure. The goal is to lift embedded dirt and grime through gentle agitation, not to attack the surface with aggressive force. Work systematically across the mat, dividing it into manageable sections to ensure thorough and consistent cleaning.
Pay special attention to areas with deeper grooves or more significant dirt accumulation. These zones might require slightly more focused scrubbing, but maintain a light touch. Rotate the brush periodically to prevent dirt buildup on the bristles, which could potentially redeposit grime onto the clean surface. Listen to the sound of your scrubbing – a soft, consistent brushing indicates proper technique, while harsh scratching suggests you need to reduce pressure.
Consider these crucial scrubbing guidelines:
- Maintain consistent, light pressure during brushing
- Use circular motions for maximum dirt removal
- Rinse brush frequently to prevent cross-contamination
- Work in well-lit areas to monitor cleaning progress
Comprehensive rubber floor maintenance strategies highlight the importance of technique over force. After scrubbing, visually inspect the mat for uniform cleaning. A well-scrubbed surface should appear consistently clean, with dirt and stains significantly reduced or eliminated.
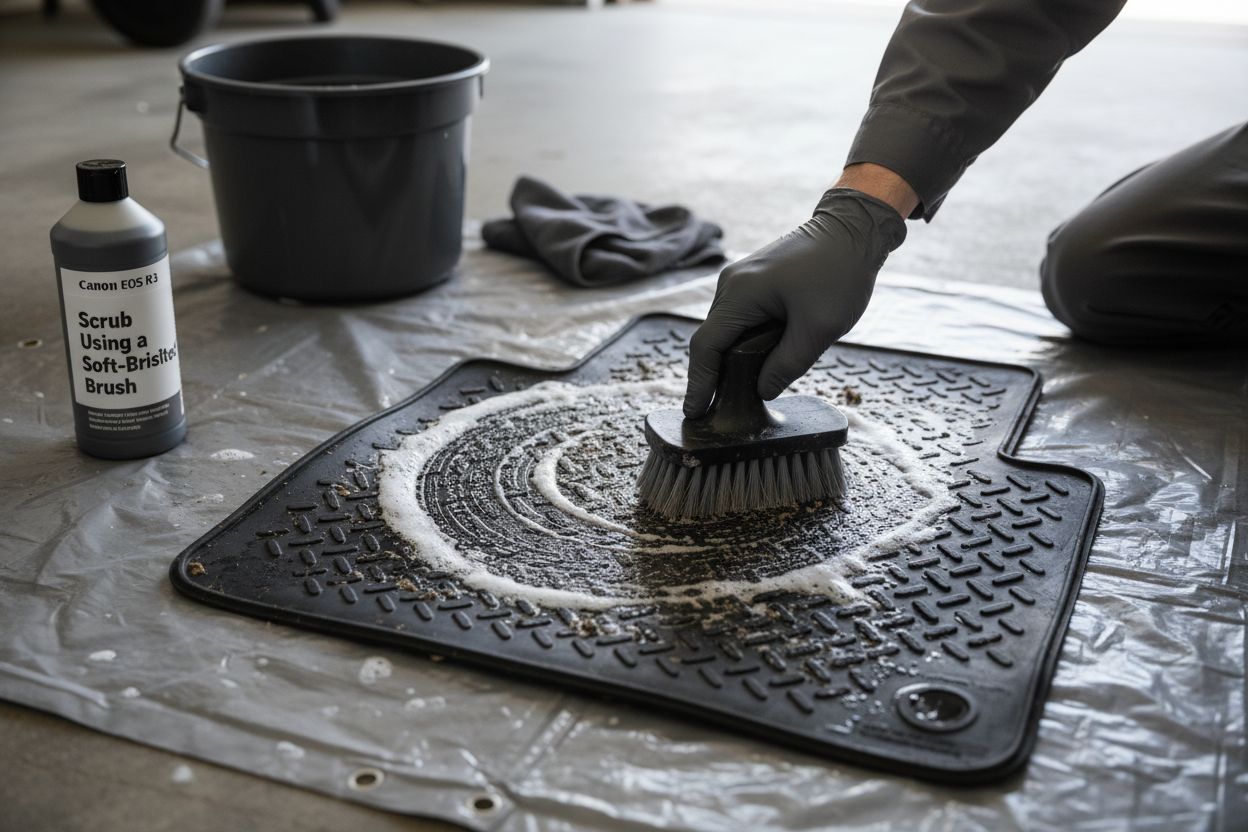 The rubber should maintain its original texture and color, demonstrating that your soft-bristled brush technique has successfully restored the mat without causing unnecessary wear.
Step 6: Rinse and Dry the Mats Thoroughly
Rinsing and drying car rubber floor mats is a critical phase that determines the final quality of your cleaning process. Improper rinsing or inadequate drying can compromise all previous cleaning efforts, potentially leading to residual soap buildup or unwanted moisture retention. Select a location with good drainage and sufficient airflow to facilitate a comprehensive cleaning and drying procedure.
Begin the rinsing process by using clean, cool water at moderate pressure. Avoid high-pressure streams that might damage the rubber’s surface or force water into potential weak points. Systematically rinse each mat, ensuring all cleaning solution and loosened dirt are completely removed. Move the water stream across the mat in consistent, overlapping motions to guarantee thorough coverage and prevent any soap or debris from remaining trapped in mat textures or grooves.
Drying requires equal precision and attention to detail. Use clean, lint-free microfiber towels to initially remove excess moisture. Gently press and pat the surface rather than rubbing, which could introduce additional dirt or potentially damage the rubber’s texture. Position the mats in a well-ventilated area away from direct sunlight, as excessive heat can cause rubber materials to crack or degrade. Allow natural air circulation to complete the drying process, periodically rotating the mats to ensure uniform drying.
Consider these essential drying recommendations:
- Avoid using heat sources like hairdryers
- Select a clean, flat surface for drying
- Ensure complete air circulation around mats
- Check mat edges and textured areas for remaining moisture
Comprehensive floor mat maintenance techniques emphasize the importance of thorough drying. Verify the mats are completely dry by touching multiple areas and checking for any remaining dampness. Properly dried mats should feel firm, maintain their original shape, and show no signs of water retention.
This overview table summarizes each main cleaning step, highlighting key actions and the intended outcome so you can quickly reference the process at a glance.
| Step | Key Action | Intended Outcome |
|---|---|---|
| Gather Supplies & Equipment | Assemble brushes, towels, cleaner, gloves | Be fully equipped for efficient cleaning |
| Remove Mats from Vehicle | Detach mats, noting fastening points | Prevent damage; prep mats for cleaning |
| Shake Out Dirt and Debris | Shake and beat mats outdoors | Eliminate loose dirt before washing |
| Apply Cleaner | Use rubber-safe solution and soft brush | Loosen surface grime and stains |
| Scrub with Soft-Bristled Brush | Clean in sections using gentle circular motion | Remove embedded dirt carefully |
| Rinse and Dry Thoroughly | Rinse with cool water, dry in vented area | Prevent residue, preserve mat quality |
Transform Your Car Care Routine With Professional-Grade Mats and Accessories
Maintaining spotless car rubber floor mats can feel like a never-ending battle. The step-by-step guide above highlights common frustrations such as dealing with stubborn dirt, the need for the right cleaning solutions, and the struggle to keep mats looking new after repeated use. If you want to simplify your cleaning routine and extend the lifespan of your mats, it’s time to consider mats and accessories that are designed for durability and easy maintenance.
With Mats4U.com, you get access to commercial-grade products trusted by professionals. Discover our Accessories for must-have cleaning tools and explore our full selection of Commercial Mats built to handle heavy dirt and rigorous cleaning cycles. Start shopping today and enjoy the peace of mind that comes from investing in products made in the USA, with free delivery on orders over $100. Make the effective cleaning methods you just learned even easier—visit Mats4U.com now to find your ideal mat solution.
Frequently Asked Questions
How do I remove car rubber floor mats for cleaning?
To remove car rubber floor mats, adjust your seats for maximum access and gently lift each mat while checking for attachment mechanisms like clips or Velcro. Take care to avoid pulling too hard, as this could damage the mats or your vehicle’s interior.
What supplies do I need for cleaning rubber floor mats?
Gather soft-bristled brushes, microfiber towels, a sturdy bucket, rubber-safe cleaning solution, and protective gloves. Start your cleaning project by assembling all these materials to ensure a smooth cleaning process.
How do I effectively apply cleaner to my rubber floor mats?
Dilute the rubber floor mat cleaner according to manufacturer instructions, then use a soft-bristled brush to apply it in small sections with circular motions. Focus on heavily soiled areas and avoid oversaturating the mats to enhance cleaning effectiveness.
What is the best way to scrub rubber floor mats without damaging them?
Use a soft-bristled brush and apply light pressure while scrubbing in circular motions across the mat’s surface. Maintain control and avoid excessive force to prevent abrasions, ensuring the mats remain in good condition.
How do I ensure my rubber floor mats dry completely after cleaning?
After rinsing your mats with clean water, use microfiber towels to pat them dry and then place them in a well-ventilated area away from direct sunlight. Check for moisture in edges and textured areas to confirm complete drying before reinstallation.
Why is it important to shake out debris before washing rubber floor mats?
Shaking out loose dirt and debris helps prevent scratching during cleaning and prepares the mats for deep cleaning. Prioritize this step to maximize the cleaning effectiveness and preserve your mats’ surface integrity.