
Car floor mats soak up an unbelievable amount of dirt. The average driver tracks in over a pound of debris every year just from their shoes. Most people expect a quick vacuum to fix the mess. That barely scratches the surface because real mat cleaning goes way beyond what you’d guess.
Table of Contents
- Step 1: Gather Necessary Cleaning Supplies
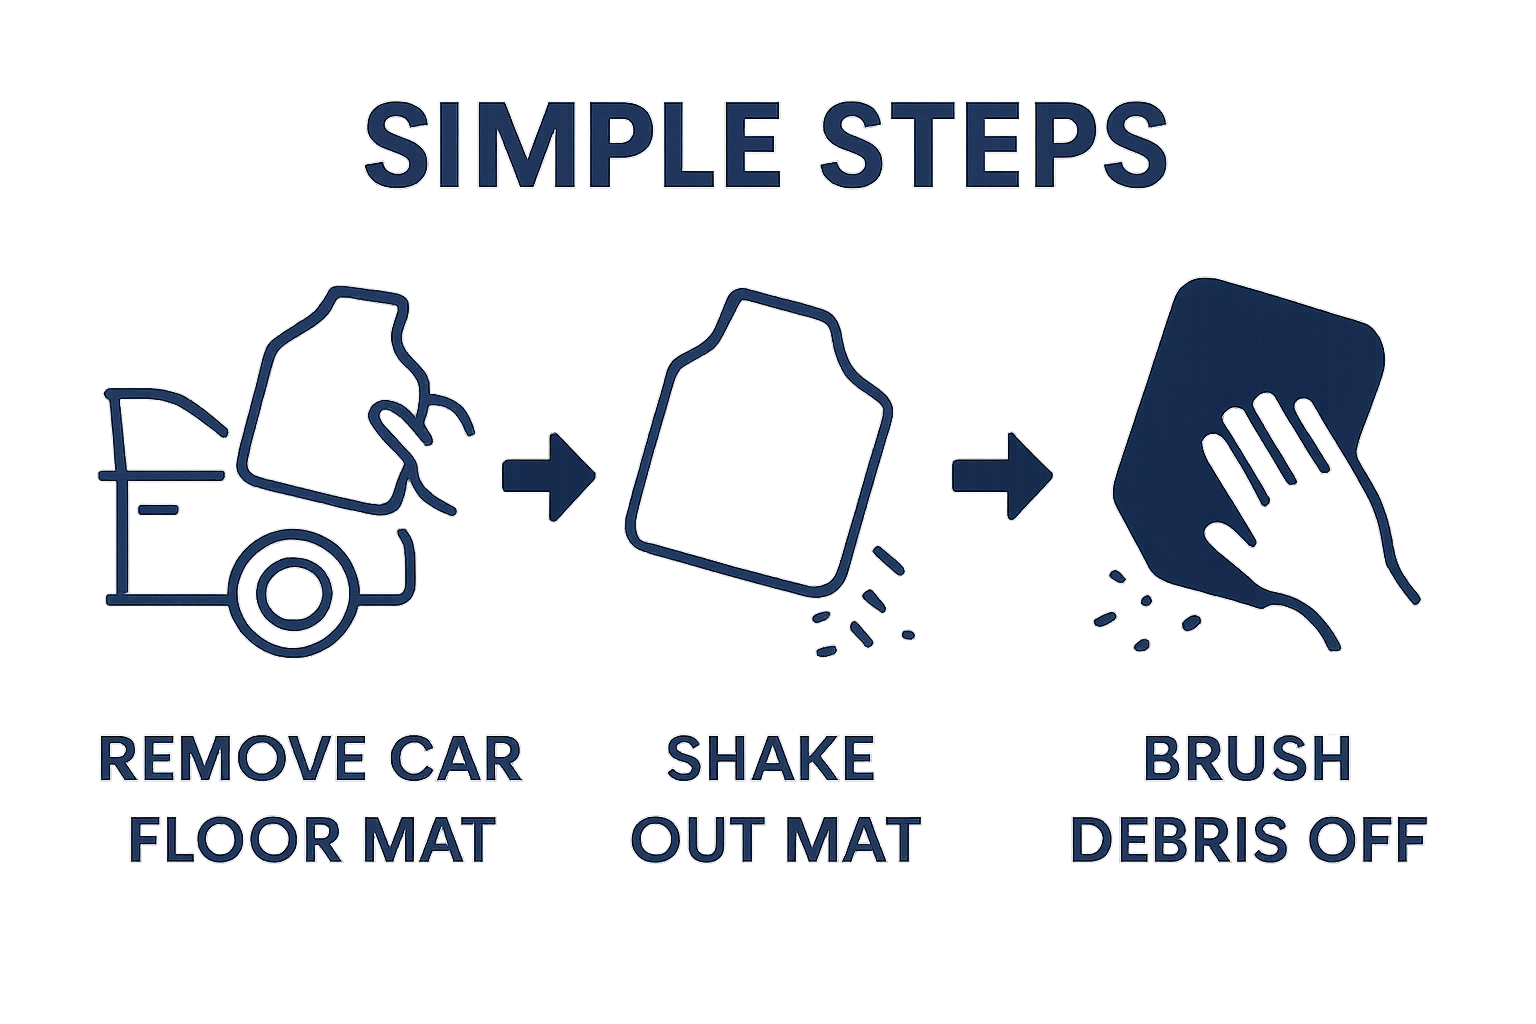
- Step 2: Remove Floor Mats From Vehicle
- Step 3: Shake Off Debris And Loose Dirt
- Step 4: Apply Cleaning Solution And Scrub
- Step 5: Rinse And Dry Floor Mats Thoroughly
- Step 6: Reinstall Mats And Verify Cleanliness
Quick Summary
| Key Point | Explanation |
|---|---|
| 1. Gather essential cleaning supplies | Collect microfiber towels, cleaning agents, and protective gear to ensure an efficient cleaning process. |
| 2. Remove mats carefully for cleaning | Detach floor mats gently to avoid damage and cross-contamination while allowing for thorough cleaning. |
| 3. Shake off debris before washing | Shake mats outside to remove loose dirt, preventing it from interfering with the deeper cleaning process. |
| 4. Use appropriate cleaning solutions | Match the cleaning agent to mat material, using mild solutions for fabric and more robust options for rubber. |
| 5. Verify cleanliness before reinstalling | Check that mats are completely dry and clean before putting them back to maintain a professional appearance. |
Step 1: Gather Necessary Cleaning Supplies
Successful car floor mat cleaning begins with assembling the right tools and supplies. Preparing your cleaning arsenal strategically ensures an efficient and thorough cleaning process that protects your vehicle’s interior and extends the life of your floor mats.
Essential Cleaning Equipment
To tackle car floor mat cleaning effectively, you will need a comprehensive set of supplies that work across different mat materials. Start by collecting microfiber towels, which are critical for absorbing moisture and preventing lint transfer during the cleaning process. High-quality microfiber towels provide superior cleaning performance compared to standard cloths or paper towels.
Your cleaning toolkit should include specific cleaning agents matched to your floor mat material. For rubber or synthetic mats, a mild detergent or specialized automotive cleaning solution works best. Fabric and carpet mats might require a different approach, such as upholstery cleaner or carpet shampoo designed to lift dirt without damaging fibers.
Additional critical tools include a soft-bristled brush for gentle scrubbing, a vacuum cleaner with upholstery attachments, and a bucket for mixing cleaning solutions. Protective gear like rubber gloves will shield your hands from harsh chemicals and keep them clean during the process. According to automotive maintenance experts at Popular Mechanics, having the right equipment makes a significant difference in achieving professional-quality results.
Consider gathering the following specific items before beginning your car floor mat cleaning:
- Microfiber towels
- Soft-bristled brush
- Vacuum cleaner
- Automotive cleaning solution
- Rubber gloves
- Bucket
- Garden hose or access to running water
By methodically preparing your cleaning supplies, you set the stage for a successful mat restoration process that will leave your vehicle’s interior looking fresh and well-maintained.
Below is a table summarizing the essential cleaning equipment, their specific purpose, and any important notes for use when cleaning car floor mats.
| Equipment | Purpose | Notes |
|---|---|---|
| Microfiber towels | Absorb moisture and prevent lint transfer | Superior to standard cloths or paper towels |
| Soft-bristled brush | Gentle scrubbing of mat surface | Avoids damage to fibers/rubber |
| Vacuum cleaner | Remove dust, crumbs, and loose debris | Use upholstery attachment for best results |
| Automotive cleaner | Loosen and remove dirt/grime from mats | Match to mat material (fabric or rubber) |
| Rubber gloves | Protect hands from chemicals and dirt | Recommended for all cleaning agents |
| Bucket | Mix and hold cleaning solutions | Mix according to cleaner directions |
| Garden hose/water | Rinse away dirt and cleaning solution | Use gentle pressure for delicate mats |
Step 2: Remove Floor Mats from Vehicle
Removing floor mats from your vehicle is a critical preparation step that enables comprehensive cleaning and prevents cross-contamination of dirt between different surfaces. This strategic approach ensures you can clean both the mats and the vehicle’s underlying carpet thoroughly and efficiently.
Proper Mat Removal Technique
Begin by adjusting your vehicle’s seat positions to create maximum accessibility. Front seat mats typically require sliding the seats fully backward to expose their entire surface area. For vehicles with multiple rows, like SUVs or minivans, carefully remove mats from each section, starting from the front and moving towards the rear.
Carefully lift each mat, paying attention to potential attachment points like hooks or clips that might secure them to the vehicle floor. Some modern vehicles have retention systems designed to prevent mats from sliding, so gently disengage these mechanisms without applying excessive force. If you encounter resistance, examine the mat’s connection points carefully to avoid damaging either the mat or the vehicle’s interior.
When removing mats, create a designated clean area where you can place them for subsequent washing. Shake out loose debris outdoors before bringing mats inside for thorough cleaning. This preliminary step prevents spreading dirt throughout your vehicle or cleaning workspace. According to automotive maintenance experts at Car and Driver, proper mat removal is essential for preventing potential damage to your vehicle’s interior and ensuring a comprehensive cleaning process.
Consider these key considerations during mat removal:
- Check for any personal items trapped underneath mats
- Note the original positioning of each mat for correct reinstallation
- Inspect mats for signs of significant wear or damage
- Create a clean, flat surface for mat cleaning
By methodically removing floor mats and preparing them for cleaning, you set the foundation for restoring your vehicle’s interior to its optimal condition.
Step 3: Shake Off Debris and Loose Dirt
Removing loose dirt and debris is a fundamental preparation step that significantly improves the overall effectiveness of your car floor mat cleaning process. This crucial stage eliminates surface-level particles that could potentially interfere with deeper cleaning techniques and prevent scratching or spreading dirt during subsequent washing.
Effective Debris Removal Technique
Choose an outdoor location with ample space to shake out your floor mats thoroughly. Concrete or hard surfaces work best, allowing dirt and debris to fall away cleanly without creating additional mess. Hold each mat firmly at opposite corners and shake vigorously, using a rhythmic motion that allows gravity to help dislodge trapped particles. For stubborn dirt, you might need to use controlled, sharp movements that create momentum and help release embedded materials.
Pay special attention to textured or ribbed mat surfaces where dirt tends to accumulate.
 Rubber and synthetic mats often have intricate designs that can trap small stones, sand, and other particulate matter. Vary your shaking technique by rotating the mat and approaching it from different angles to ensure comprehensive debris removal. Fabric and carpeted mats might require gentler handling to prevent fiber damage while still effectively removing loose dirt.
Consider using additional tools to enhance debris removal if simple shaking proves insufficient. A soft-bristled brush can help dislodge stubborn particles without damaging mat fibers. For mats with significant dirt buildup, a controlled beating motion against a stable surface like a wall or fence can provide extra cleaning power. According to automotive maintenance experts at Car and Driver, proper debris removal is essential before applying any liquid cleaning solutions.
Key considerations during debris removal include:
- Perform debris removal in a well-ventilated outdoor area
- Wear light-colored clothing to easily spot transferred dirt
- Check mat surfaces from multiple angles to ensure thorough cleaning
- Use gentle but firm motions to protect mat integrity
By meticulously removing loose dirt and debris, you prepare your floor mats for more intensive cleaning techniques, setting the stage for a comprehensive restoration of your vehicle’s interior.
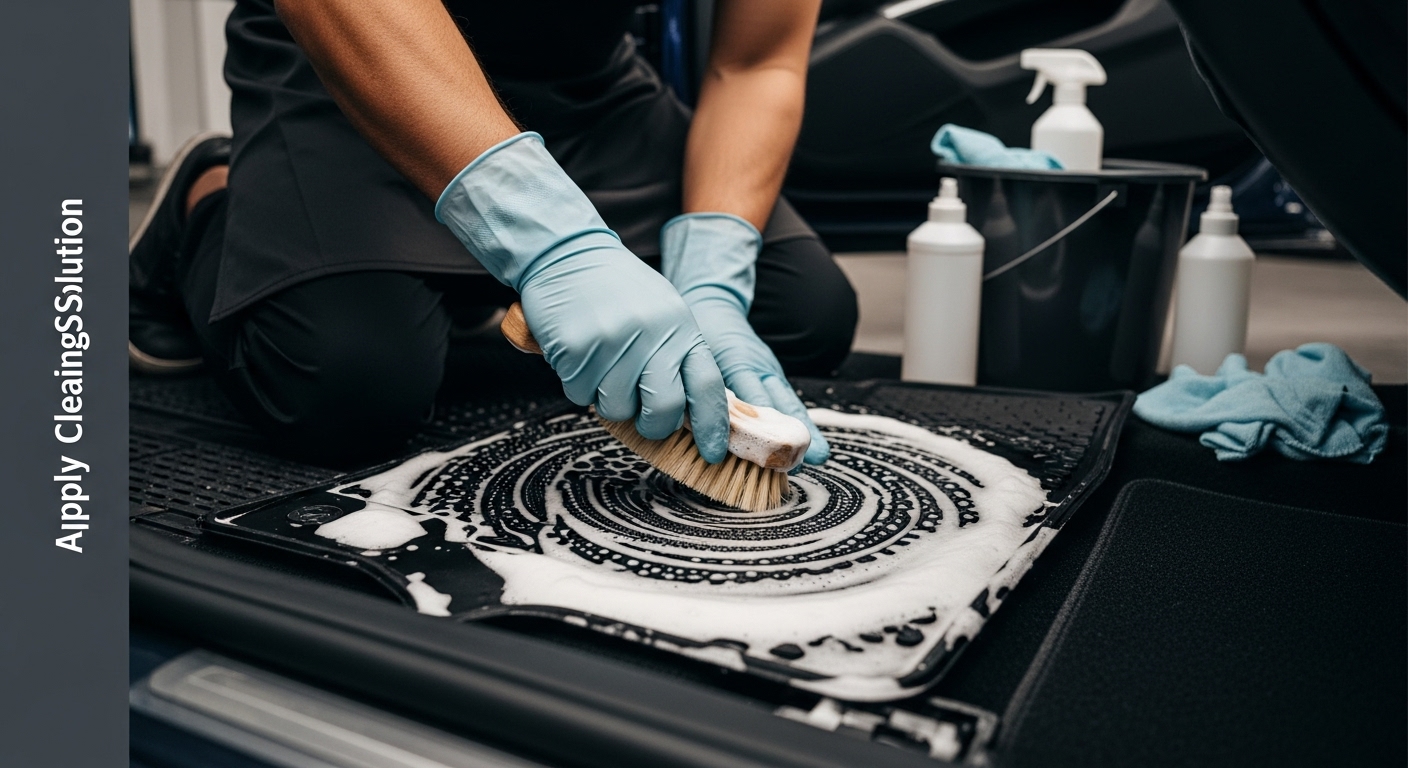
Step 4: Apply Cleaning Solution and Scrub
Applying the right cleaning solution and executing a strategic scrubbing technique transforms your car floor mats from dirty to pristine. This critical step requires precision, understanding of mat materials, and careful application to achieve optimal cleaning results without causing damage.
Targeted Cleaning Approach
Begin by selecting a cleaning solution specifically matched to your mat material. Rubber and synthetic mats tolerate more aggressive cleaning agents, while fabric and carpeted mats demand gentler approaches. Mix your chosen cleaning solution in a bucket, ensuring proper dilution to prevent oversaturation or potential material damage. For most floor mats, a mild automotive upholstery cleaner or a mixture of warm water and gentle dish soap works effectively.
Apply the cleaning solution systematically, working in small sections to maintain control and prevent uneven cleaning. Use a soft-bristled brush with moderate pressure, moving in circular motions to lift dirt without damaging mat fibers. Pay extra attention to heavily soiled areas, using slightly more pressure and allowing the cleaning solution to penetrate deeply. For stubborn stains, let the solution sit for a few minutes before scrubbing to help break down embedded dirt particles.
Consider the unique characteristics of different mat materials during the scrubbing process. Rubber mats can withstand more vigorous scrubbing, while fabric mats require a more delicate touch. Rotate your brush and change scrubbing angles to ensure comprehensive dirt removal without causing unnecessary wear. Always scrub in a consistent direction to prevent creating additional texture or potential damage to the mat surface. According to automotive maintenance experts at Car and Driver, proper scrubbing technique is crucial for effective mat cleaning.
Key considerations during cleaning and scrubbing include:
- Test cleaning solution on a small, inconspicuous area first
- Use consistent, moderate pressure during scrubbing
- Rinse brush frequently to prevent spreading dirt
- Work in well-lit areas to identify all dirty spots
By methodically applying cleaning solution and executing a precise scrubbing technique, you prepare your floor mats for the final rinsing and drying stages of the cleaning process.
Step 5: Rinse and Dry Floor Mats Thoroughly
Rinsing and drying floor mats completely is a critical final stage in the cleaning process that prevents moisture-related damage, eliminates residual cleaning solution, and ensures your mats are ready for reinstallation. This step requires careful technique and attention to detail to achieve optimal results.
Comprehensive Rinsing Strategy
Begin the rinsing process by using clean, cool water to thoroughly remove all cleaning solution from your floor mats. Direct water pressure works best for rubber and synthetic mats, while fabric mats require a gentler approach. Use a garden hose with a gentle spray nozzle, ensuring water flows evenly across the entire mat surface. Rotate the mat during rinsing to guarantee complete solution removal from all sides and textures.
For fabric and carpeted mats, be particularly mindful of potential soap residue. Excessive soap can attract dirt and create a sticky surface that accelerates future soiling. Rinse repeatedly until water runs clear, with no visible soap bubbles or discoloration. If you notice persistent soap residue, consider an additional rinse cycle or use a clean, damp microfiber cloth to help remove remaining cleaning solution. According to automotive maintenance experts at Car and Driver, thorough rinsing is essential for maintaining mat quality.
Drying requires strategic approach and patience. Spread mats in a well-ventilated area, preferably outdoors with indirect sunlight. Avoid direct, intense sunlight which can cause material discoloration or warping. Use clean, absorbent towels to blot excess moisture, changing towels as they become damp. For faster drying, consider using a fan to circulate air around the mats. If you want more insights on mat maintenance, check out our comprehensive guide on washing floor mats.
Key considerations during rinsing and drying include:
- Ensure complete soap removal
- Use clean towels for blotting
- Avoid direct, intense sunlight
- Allow sufficient air circulation
- Check mat surface for any remaining moisture
By meticulously rinsing and thoroughly drying your floor mats, you protect their longevity and maintain a clean, professional appearance for your vehicle’s interior.
Step 6: Reinstall Mats and Verify Cleanliness
The final stage of car floor mat cleaning involves carefully reinstalling your mats and conducting a thorough verification of their cleanliness and condition. This critical step ensures that your vehicle’s interior looks pristine and that your cleaning efforts have been successful.
Precise Mat Reinstallation
Begin by examining each mat for complete dryness. Any residual moisture can lead to mold or mildew growth, potentially causing unpleasant odors and damaging your vehicle’s interior. Ensure mats are entirely dry by feeling their surface and checking for any cool or damp spots. If necessary, allow additional air drying time before reinstallation.
Carefully position each mat in its original location, paying close attention to attachment points and orientation. Some vehicle floor mats have specific design features like retention hooks or positioning markers that ensure proper fit. Align the mat precisely, making sure it lies flat without bunching or creating potential tripping hazards. Rubber and synthetic mats typically have more rigid positioning, while fabric mats might require more careful adjustment to prevent wrinkling or misalignment.
Once reinstalled, conduct a comprehensive cleanliness verification. Inspect the mats from multiple angles, checking for any remaining dirt, soap residue, or imperfections. Run your hand across the surface to feel for smoothness and cleanliness. According to automotive maintenance experts at Car and Driver, a meticulous final inspection is crucial for maintaining your vehicle’s interior. For those interested in maintaining a comprehensive cleaning routine, our guide on daily cleaning checklists offers additional insights into maintaining a pristine environment.
Key considerations during reinstallation and verification include:
- Check mat positioning and attachment points
- Ensure complete dryness before reinstallation
- Inspect for any remaining dirt or cleaning residue
- Verify mat lies flat without wrinkles or bunching
- Test mat stability by gently pressing and moving
By meticulously reinstalling your floor mats and conducting a thorough cleanliness check, you complete the car floor mat cleaning process, ensuring a fresh and professional-looking vehicle interior.
This table outlines a cleaning checklist to verify that your car floor mats are ready for reinstallation and illustrate key quality checks after washing and drying.
| Verification Step | How to Check/Complete |
|---|---|
| Confirm complete dryness | Feel for damp spots or coolness over entire mat |
| Inspect for remaining dirt or residue | Examine both sides under good lighting |
| Check mat positioning and attachment | Align with original spots and secure properly |
| Verify mats lie flat | Ensure there are no wrinkles or bunching |
| Test stability | Press or move mat gently to check for shifting |
| Look for signs of wear or damage | Inspect for thinning, cracks, or tears |
Keep Your Vehicle and Facility Floors Spotless with Mats4U
If cleaning your car floor mats has revealed worn spots, stubborn stains, or overall mat fatigue, you know the challenges of maintaining fresh, long-lasting floor protection. Dirt build-up and moisture not only make cleaning harder, they can also affect the look and safety of your vehicle or business space. Whether you are managing a commercial fleet or overseeing a busy workplace, effective mat cleaning and the right replacement mats are vital for maintaining a professional environment.
It is time to take your cleanliness a step further and experience the true difference a quality mat can make. Visit our Commercial Mats collection to find durable replacements or upgrades for your vehicle or facility. Explore our full range of Accessories to support your maintenance routine, or browse Indoor Mats for high-traffic areas. Give your workspace or fleet the protection it deserves at Mats4U.com. Do not let the results of your hard work fade—choose solutions built for lasting protection and cleanliness now.
Frequently Asked Questions
How do I select the right cleaning supplies for my car floor mats?
To effectively clean your car floor mats, gather microfiber towels, a soft-bristled brush, a vacuum cleaner with upholstery attachments, and a cleaning agent suited to the mat material (rubber, synthetic, or fabric).
What is the best method to remove debris from car floor mats before cleaning?
Shake the mats outdoors to remove loose dirt and debris. For stubborn particles, use a soft-bristled brush to dislodge dirt from textured surfaces without damaging the mat.
How should I apply a cleaning solution to my car floor mats?
Mix a suitable cleaning solution according to your mat material in a bucket. Then, apply it in small sections and scrub with a soft-bristled brush using circular motions, paying attention to heavily soiled areas.
What steps should I take after cleaning my car floor mats?
After cleaning, rinse the mats thoroughly to remove residual cleaning solution and ensure they are entirely dry before reinstalling them in your vehicle to prevent mildew growth.