


TL;DR:
- Proper subfloor preparation is essential to prevent mat failure and reduce workplace injuries.
- Choosing the correct mat type and backing for specific environments enhances safety and durability.
- Regular measurement, secure installation, and ongoing maintenance extend mat lifespan and ensure safety compliance.
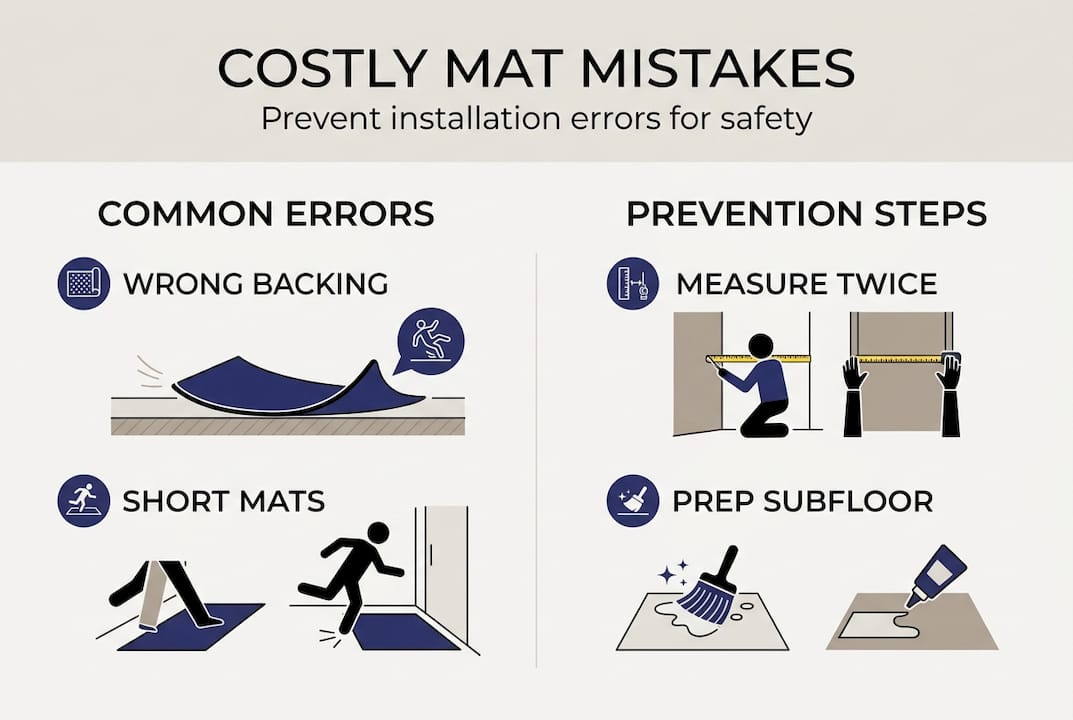
Poor mat installation is one of the most preventable sources of workplace injury, yet it remains widespread in commercial and industrial facilities. A single curled edge or undersized entrance mat can result in a slip-and-fall claim that costs tens of thousands of dollars in liability, lost productivity, and regulatory penalties. Poor installation is linked to up to 30% of workplace slip and trip incidents. This guide walks you through the most common mat installation mistakes, from subfloor prep to ongoing maintenance, and gives you the exact steps to avoid each one.
Table of Contents
- Prepare the subfloor and gather installation essentials
- Select the right mat type and backing for your environment
- Measure and size mats for maximum effectiveness
- Install and secure mats the right way for safety and compliance
- Maintain mats to preserve safety and performance
- Our take: What most facility managers overlook in mat installation
- Find the right mats and support for flawless installation
- Frequently asked questions
Key Takeaways
| Point | Details |
|---|---|
| Prep surface first | Clean, dry, and level subfloors are crucial for safety and mat longevity. |
| Choose appropriate mats | Match mat type and backing to traffic patterns, flooring, and environment. |
| Measure for full coverage | Proper sizing prevents gaps, wrinkling, and missed dirt or moisture. |
| Install securely | Use adhesives or tape and inspect edges to prevent slips and comply with OSHA rules. |
| Maintain routinely | Frequent cleaning, inspection, and timely mat rotation reduce accidents and double mat lifespan. |
Prepare the subfloor and gather installation essentials
The single most overlooked step in any mat installation is what happens before the mat ever touches the floor. Skipping subfloor preparation is a leading cause of installation failure, and the consequences compound fast. Improper subfloor preparation leads to poor adhesion, slipping, and premature wear. You need to assess the floor surface before anything else.
Start by checking for these conditions:
- Dust and debris: Sweep and vacuum thoroughly. Even fine particles prevent adhesive from bonding.
- Moisture: Use a moisture meter on concrete or tile. Readings above 3 lbs per 1,000 sq ft per 24 hours indicate a problem.
- Uneven areas: Fill low spots and grind down high spots. A floor that varies more than 3/16 inch over 10 feet will cause mat edges to lift.
- Residue: Remove old adhesive, wax, or sealant with the appropriate solvent before proceeding.
Once the surface is clean and level, gather your installation materials. Here is what a complete kit looks like:
| Material | Purpose |
|---|---|
| Pressure-sensitive adhesive or double-sided tape | Secures mat to floor |
| Floor roller (75 to 100 lbs) | Ensures full contact and bond |
| Cleaning solvent | Removes residue and contaminants |
| Moisture barrier primer | Protects against subfloor moisture |
| Utility knife and straight edge | Trims mat to fit |
| PPE (gloves, knee pads, safety glasses) | Protects installer during work |
OSHA non-slip requirements mandate that walking surfaces be maintained in a clean, dry, and slip-resistant condition. That standard applies to the base floor before the mat goes down, not just after. Reviewing the commercial walk-off mats guide can also help you match prep requirements to specific mat categories.
Pro Tip: After cleaning the subfloor, let it dry for a full 24 hours before installing any mat. Rushing this step is one of the most common causes of adhesive failure within the first 30 days.
Select the right mat type and backing for your environment
Choosing the wrong mat for your environment is just as damaging as skipping subfloor prep. Wrong mat type for environment or traffic leads to rapid wear, poor performance, and safety failures. The variety of commercial mat types exists for a reason, and matching them correctly to your facility conditions is non-negotiable.
Here is a quick breakdown of the main categories:
- Entrance and walk-off mats: Designed to scrape and absorb dirt and moisture at entry points.
- Anti-fatigue mats: Reduce worker fatigue in standing workstations. See the industrial anti-fatigue mat selection resource for detailed guidance.
- Chemical-resistant mats: Used in labs, food processing, and manufacturing areas where spills are frequent.
- Electrostatic dissipative (ESD) mats: Required in electrical assembly zones to prevent static discharge damage.
- Forklift-rated mats: Built with reinforced construction to withstand heavy equipment traffic without deforming.
Backing selection is equally critical. Incorrect backing causes mats to migrate, slip, and create trip hazards. Use this comparison to guide your decision:
| Surface type | Recommended backing | Traffic level |
|---|---|---|
| Smooth tile or vinyl | Nitrile rubber | Light to heavy |
| Carpet | Gripper or cleated backing | Light to medium |
| Concrete (dry) | Vinyl or rubber with suction cups | Medium to heavy |
| Wet or outdoor areas | Drainage-style rubber | Heavy |
| ESD-sensitive zones | Conductive vinyl | Controlled |
For facilities with mixed-use areas, like a loading dock that transitions into a carpeted office corridor, you may need different mat types within a few feet of each other. The commercial entrance mat guide covers transition zone planning in detail.
Edge cases matter too. Forklift lanes need mats rated for dynamic loads, not just static weight. Electrical zones require certified ESD ratings, not just any rubber mat. Getting this wrong creates both safety and compliance exposure.
Measure and size mats for maximum effectiveness
Even the best mat fails if it is the wrong size. Undersized mats leave gaps that allow dirt and moisture to pass through, while oversized mats bunch up and create their own trip hazards. Inaccurate measurements cause poor fit, waste, and safety risks.
Follow these steps to measure correctly:
- Measure the full entry width from wall to wall, or door frame to door frame.
- Measure the depth in the direction of foot traffic, not just the width.
- Take measurements at multiple points across the space. Floors are rarely perfectly square.
- Account for clearance: Leave 1/4 to 1/2 inch between the mat edge and any wall, door threshold, or fixed obstacle.
- Use a cardboard template for non-rectangular spaces like L-shaped corridors or angled entries.
- Verify door swing clearance before finalizing depth. A mat that prevents a door from opening fully is a fire code violation.
Sizing directly affects performance. Mats under 12 feet in length fail to capture enough dirt and moisture, but a properly sized mat of 12 to 15 feet captures up to 85% of incoming contaminants. That benchmark is the standard for a functional three-zone entrance matting system.
For high-traffic facilities, the mat size selection guide provides specific recommendations by entry type and daily foot count. And for entrance-specific sizing, the commercial mats entrance guide breaks down coverage zones by building category.
Do not estimate. Measure twice, order once. A mat that is even 6 inches short of the optimal coverage zone will underperform every single day.
Install and secure mats the right way for safety and compliance
With the right mat measured and ready, proper installation is what converts preparation into actual safety. Skipping secure installation causes curling, movement, and falls. Adhesives, tape, and a floor roller are all required steps, not optional ones.
Follow this installation sequence:
- Dry fit the mat in its final position and confirm clearances before applying any adhesive.
- Apply pressure-sensitive adhesive or double-sided tape to the perimeter and center of the mat backing, following the manufacturer’s coverage pattern.
- Position the mat carefully and press it down from the center outward to avoid air pockets.
- Roll the entire surface with a 75 to 100 lb floor roller to ensure full contact and bond activation.
- Check all edges for lifting or gaps immediately after rolling. Press any raised edges down firmly.
- Allow cure time before opening the area to foot traffic. Most adhesives require 24 hours for full bond strength.
OSHA standard 29 CFR 1910.22 requires that floor and walking surfaces be kept clean, dry, and in good condition. Mats must lie flat and be secured to prevent movement that could create a tripping hazard.
Pro Tip: After the initial cure period, walk the entire mat perimeter and apply firm pressure to every edge. Repeat this spot check weekly for the first month. Early detection of edge lift prevents the curling that causes most mat-related falls.
For facilities with anti-fatigue applications, the industrial mat installation tips resource covers specialized securement methods for workstation mats.
Maintain mats to preserve safety and performance
Installation is not the finish line. A mat that is properly installed but poorly maintained will degrade into a hazard within months. Neglecting maintenance causes debris buildup, reduced effectiveness, and hazards. Adequate care can double mat service life.
Build these steps into your facility maintenance program:
- Daily vacuuming for high-traffic entrance mats to prevent compacted debris from flattening the pile.
- Weekly spot cleaning of stains and spills using manufacturer-approved cleaning solutions.
- Monthly deep washing for mats in food service, healthcare, or industrial environments.
- Quarterly inspections for frayed edges, flattened pile, backing separation, or curl. Any of these conditions warrants immediate rotation or replacement.
- Annual full audit of all mat positions, sizes, and types to confirm they still match current traffic patterns and facility use.
Mat rotation extends service life significantly. Rotating mats between high-traffic and lower-traffic positions allows even wear and defers replacement costs. Replace any mat showing frayed edges or a flattened pile immediately. These are not cosmetic issues. They are slip and trip hazards.
Pro Tip: Keep a simple maintenance log for each mat location. Record cleaning dates, inspection findings, and replacement history. This documentation reduces insurance exposure and supports OSHA compliance audits.
The business mat maintenance guide provides a full schedule template and product-specific care instructions for Waterhog, rubber, and anti-fatigue mats.
Our take: What most facility managers overlook in mat installation
Most facility managers focus on the big mistakes: wrong mat type, no adhesive, skipped inspection. Those matter. But the real risk accumulates in the small gaps. A mat that is 2 inches short of the door frame. A cleaning cycle that slips from monthly to quarterly. A worn corner that nobody flags because it has always looked like that.
These small failures compound. One worn edge plus a wet floor plus a distracted employee equals an incident report and a workers’ comp claim. The hidden cost is not just the claim. It is the insurance premium increase, the OSHA inspection, and the reputational exposure.
We also see facilities that invest in quality mats but skip zone planning entirely. A single mat at a door is not a system. A three-zone approach, as covered in practical industrial matting advice, captures significantly more contamination and reduces cleaning labor costs downstream.
Walk your facility. Look at every mat edge, every transition zone, every high-traffic path. The vulnerabilities are visible if you look for them.
Find the right mats and support for flawless installation
Getting mat installation right starts with sourcing professional-grade products built for your specific environment. At Mats4U.com, the product range covers every commercial and industrial application, from high-traffic entrance solutions to custom-branded options. The WaterHog Max Grand mat delivers heavy-duty scraping and moisture control for demanding entry points. For facilities that need branded floor coverage, custom logo mats combine safety function with professional appearance. Free delivery applies on orders over $100, and all products are Made in the USA. Browse the full catalog at Mats4U.com to find the right fit for your facility.
Frequently asked questions
What is the most common mat installation mistake in commercial buildings?
Failing to prepare the subfloor is the leading mistake. Improper subfloor preparation leads to poor adhesion, slipping, and premature mat failure that compounds over time.
How long should entrance mats be for effective dirt capture?
Best practice recommends 12 to 15 feet in length. Mats at this length capture up to 85% of incoming dirt and moisture before it reaches interior floors.
How often should commercial mats be replaced or rotated?
Inspect mats quarterly, rotate them between high and low-traffic positions as needed, and replace any mat with frayed edges or a flattened pile immediately. Quarterly rotation maintains both safety and mat performance.
What backing is best for mats on tile or carpeted floors?
Use nitrile rubber backing on hard floors like tile and use gripper or cleated backing for carpeted surfaces. Correct backing selection prevents mat migration and eliminates trip hazards at the mat perimeter.
Do OSHA regulations require specific mat installation methods for compliance?
Yes. OSHA 29 CFR 1910.22 requires that mats be secured flat on clean, dry, slip-resistant surfaces to avoid creating walking hazards in any commercial or industrial facility.
Recommended
- Mat maintenance tips for commercial property managers – Mats4U USA
- Mat maintenance best practices for safety and longevity – Mats4U USA
- Mat size selection guide for high-traffic spaces – Mats4U USA
- A Guide to Choosing and Using Indoor Entrance Floor Mats – Mats4U USA
- Leitfaden Dämmung Dachgeschoss: Effizient sanieren und sparen


